HOW I BUILT MY TRUCK BED DIY CAMPER
Our first year in Alaska we roughed it during our weekend outings, braving the weather and elements in a silk tent and using a tarp to keep things dry. This worked fine for the first year but to make my wife and camping life a little more comfortable I decided that we needed a camper. We started looking online but couldn’t really find the right one, so I decided to build the one we wanted. I wanted to create a camper that would we could cook in, store our gear, and keep us dry. I also wanted it to be big enough to sleep 4-5 comfortably and be light enough that my truck could carry it and pull a trailer or boat.

MAKING DECISIONS
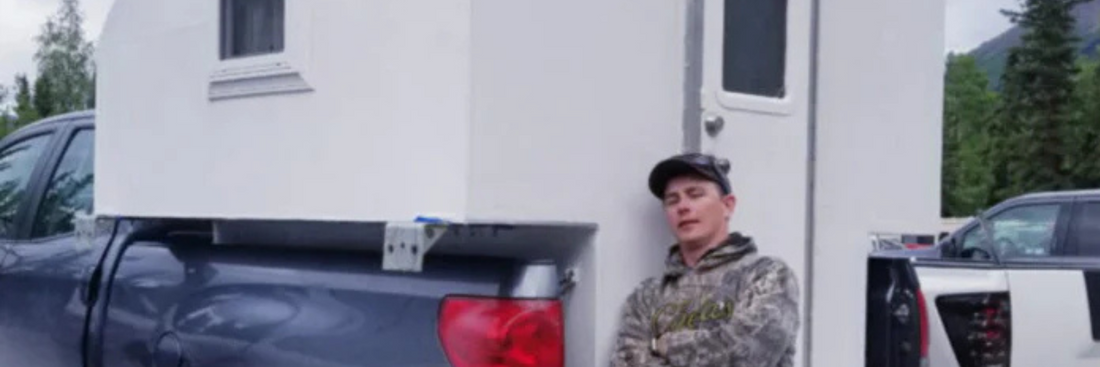
I decided against an over the cab camper because it figured would be too heavy. I drew up some scratch blueprints and got a rough idea. I first cut a piece of ½”plywood to 78” that would in the bed of my truck. This would be the bottom floor. From that I would start the framing. For the the majority of the frame I used 2x2’s to keep it light. Any weight bearing corner or support beam I used 2x4’s. I measured the distance I would need to clear the truck bed rails and form there I would build out. This first section consisted the bedding area and of the storage areas underneath the beds. The bedding area is two 36” x 78” platforms on each side with a walkway in between. This would sleep two over each bed rail. I then ran a 2x2 long ways down the walkway on each bed about ½” from the top of each bed. I did this so I could put sections of ½” plywood in the middle over the top of the walkway and create one big sleeping area. It is a 84” wide x 78” long area I dubbed the name “MEGA bed.” Next I completed framing of the face, the rear and the sides walls.PROCESS FOR DOOR AND FRONT
I put an angle on the face of the camper to help eliminate wind resistance while driving. For the rear wall I did a rough doorway because I didn't have a door yet. I went to hardware store and looked for possible door and window options. The hardware store didn't have an the door I was looking for but it did have some windows on clearance that I picked up. I scoured the internet and search for camper doors possibilities but I found brand new doors were close to $500. I finally found a guy piecing out an old camper, from it I pulled the door, a sky vent, and the camper jacks all for $200.FRAMING COMPLETED
Once the framing was complete the next task was putting the plywood on the outside. I used a lighter ⅜” plywood for the sides and the rear thinking weight was a factor. For the front and roof I used ¾” plywood because I figured these areas would take the brute of winds and weather. All the seams I put caulk a weatherproofing tape because I was super paranoid and rain and snow.POOR MAN'S FIBER GLASS EXTERIOR
Next I created a poor man’s fiber glass for the exterior siding. I mixed 2 parts wood glue with one part water until the consistency was similar to paint. I then took a paint roller and essentially painted the outside of the camper with the thinned wood glue. Next I took an old fabric sheet, that I got at Goodwill, and flatted it on the siding over the wet glue. I folded the sheet over each edge and corner so there was about 2” of overlap on each edge. I used a staple gun to help hold the sheet in place. It is very important not to have any creases so I took a long flat 2x4 and smoothed out the sheet. Once the glue dried I would remove the staples so they wouldn’t show. I then painted over the sheet first with 3 coats of an exterior latex based paint. Lastly for an extra weather protection I painted a flex seal rubberized paint over the latex paint. This makes the water just bead off the camper.CAMPER INTERIOR
For the interior of the camper we insulated the walls, ceiling and the floors with a 2” Styrofoam insulation we picked up at the Home Depot. I then put hardwood looking siding to give the interior a cabin like feel. For the storage areas underneath the bed we have small rectangular trash cans. That are bungeed in to keep them snug while we travel. In the storage containers is where we keep our pots, pans, spices, flash lights, and other general camping and cooking gear that says in the camper. Towards the front of the camper we have more removable storage units that have drawers. The carpet in the walkway is a removable shag carpet we picked up at a Goodwill. On the two main bedding areas we have a thin outdoor carpet and then two Foam pads stacked on top of that. The Pads are just camping pads we got at Fred Myers then covered with a waterproof sheet and then regular sheet. My wife decorated and painted the inside and I hung some rod holders to the ceiling. For the lighting we got tap lights from Costco that even come with a remote and can change different colors (for mood lighting).OVERALL COST AND MATERIALS
In all the camper cost about $1500 to make with biggest cost being wood for the frame. I wish I would have wrote down exactly how many boards I use and plywood but I can give a general estimate. The following is an approximate of materials:MATERIALS USED
- 8x2x2 for framing = 30 total
- 10x2x4 for framing = 25 total
- 3/8 plywood = 10 total
- ½ plywood = 5 total
- ¾ plywood = 3 total
- 3 gallons white exterior paint
- 2 gallons flex seal paint
- 2 windows
- 1 door
- Vent
- Torque head screws
- Sizes
- Sizes
- Sizes
- Sizes
- Sheets x 12
- Wood Glue x 2 gallon
- Paint rollers x 4